Proyecto: Videojuego Arcade
Este proyecto tiene por objetivo la creación de un arcade clásico de los años 70 y principios de los 80 donde se utilizaban displays, pontenciómetros e interrupters en el gabinete para complementar el videojuego.
En específico se utilizará el juego Speed Race (Taito, 1974) o Monaco GP (Sega, 1979) como principal inspiración.
Componentes del Proyecto
El proyecto consiste en usar los componentes de hardware que estarán conectados via GPIO o Conexión Serial (ESP32) a una Raspberry PI o Computador con un videojuego creado en PICO-8 (https://pico-8.fandom.com/wiki/GPIO) o TIC-80 (https://tic80.com/play). Se debe crear o seleccionar un juego y habilitar controlarlo con los sensores y gatillar eventos como leds u otros movimientos de los actuadores.
Para este ejemplo se utilizará un potenciómetro y un led rgb para enviar eventos al juego y mostrar un color azul si se llega a un puntaje específico y un color rojo si se pierde una vida.
| Componente | Cantidad | Descripción |
|---|---|---|
Potenciometro |
1 |
Simula un manubrio de carreras. https://afel.cl/products/potenciometro-500k-ohm |
Led RGB |
1 |
Muestra hitos de puntaje o estado de Game Over. https://afel.cl/products/diodo-led-rgb-5mm |
Botones |
2 |
Simula teclas "Z" y "X" en juegos que lo requieran. https://afel.cl/products/boton-tactil-tapa-12x12x7-3-interruptor |
Resistencias |
3 |
Necesarias para proteger al LED. |
También se puede obtar por un Kit de componentes básicos como
TIC-80
TIC-80 si bien tiene mayor flexibilidad de que PICO-8 al ser de código libre, no tiene funcionalidades para leer o escribir datos en serial o GPIO. Por lo que la opción es lo siguiente:
-
Se crea un projecto en ESP32 que lea todos los sensores
-
Se comunica via serial a un demonio creado en un lenguaje de programación como Go o Python
-
Este demonio gatilla eventos de teclado para simular presión de botones dentro de TIC-80.
-
TIC-80 escribe en un archivo de texto serial el Score actual.
-
El demonio lee el archivo y lo parsea para mostrar los datos en el display segmentado.
Para poder ejecutar el juego y obtener los registros del log se puede ejecutar el siguiente comando:
$ ./tic80 esp32.tic > out.log &También se puede redireccionar directamente el stdout al daemon que usaremos como puente entre la ESP32 y TIC-80.
$ ./tic80 esp32.tic | daemonEl siguiente código demuestra como utilizar la función trace()
para enviar información a stdout desde TIC-80.
> new lua-- title: esp32 test cart
-- author: ninjas.cl
-- desc: A test cart for input/output to esp32
-- site: elixircl.github.io/elixir-robotics
-- license: BSD License
-- version: 0.1
-- script: lua
t=0
x=96
y=24
function TIC()
cls(13)
if btn(0) then y=y-1 end
if btn(1) then y=y+1 end
if btn(2) then x=x-1 end
if btn(3) then x=x+1 end
if btn(4) then
print("Player 1: A", 90, 100)
end
if btn(5) then
print("Player 1: B", 90, 100)
end
if btn(6) then
print("Player1: X", 90, 100)
end
if btn(7) then
print("Player1: Y", 90, 100)
end
spr(1+t%60//30*2,x,y,14,3,0,0,2,2)
print("ESP32 TEST",84,84)
t=t+1
if t > 999 then
t = 0
end
print(t, 0, 0)
trace("stdout=time:"..t)
end
-- <TILES>
-- 001:eccccccccc888888caaaaaaaca888888cacccccccacc0ccccacc0ccccacc0ccc
-- 002:ccccceee8888cceeaaaa0cee888a0ceeccca0ccc0cca0c0c0cca0c0c0cca0c0c
-- 003:eccccccccc888888caaaaaaaca888888cacccccccacccccccacc0ccccacc0ccc
-- 004:ccccceee8888cceeaaaa0cee888a0ceeccca0cccccca0c0c0cca0c0c0cca0c0c
-- 017:cacccccccaaaaaaacaaacaaacaaaaccccaaaaaaac8888888cc000cccecccccec
-- 018:ccca00ccaaaa0ccecaaa0ceeaaaa0ceeaaaa0cee8888ccee000cceeecccceeee
-- 019:cacccccccaaaaaaacaaacaaacaaaaccccaaaaaaac8888888cc000cccecccccec
-- 020:ccca00ccaaaa0ccecaaa0ceeaaaa0ceeaaaa0cee8888ccee000cceeecccceeee
-- </TILES>
-- <WAVES>
-- 000:00000000ffffffff00000000ffffffff
-- 001:0123456789abcdeffedcba9876543210
-- 002:0123456789abcdef0123456789abcdef
-- </WAVES>
-- <SFX>
-- 000:000000000000000000000000000000000000000000000000000000000000000000000000000000000000000000000000000000000000000000000000304000000000
-- </SFX>
-- <PALETTE>
-- 000:1a1c2c5d275db13e53ef7d57ffcd75a7f07038b76425717929366f3b5dc941a6f673eff7f4f4f494b0c2566c86333c57
-- </PALETTE>
-- <TRACKS>
-- 000:100000000000000000000000000000000000000000000000000000000000000000000000000000000000000000000000000000
-- </TRACKS>En el resto del proyecto, se utilizará el juego CAR ADVENTURE con una modificación en el código para enviar eventos a través del standard output.
Modificación del codigo fuente
El código fuente de un juego se puede acceder después de ejecutarlo a través de TIC-80, al presionar la tecla ESC. En el editor de código ahora abierto, usa la función de búsqueda (CTRL+F) para modificar las siguientes secciones:
  ...
	print("Score:"..math.ceil(player.score),5,128,COLRscore_2,true)
	print("Score:"..math.ceil(player.score),4,127,COLRscore_1,true)
	--Score


  -- nuevo
	if player.score % 2500 <= 15	then
		trace("event:score_milestone")
	end

......
if player.IsCracked == true then
PlayExplode()--Explosion!!!
trace("event:explode") -- nueva linea
if Exp_stop == false then
sfx(63,"C-4",30,3,15,7)--...And sound
Exp_stop = true
end
end
...Luego de realizar las modificaciones, la nueva versión se puede guardar presionando CTRL+S.
Esquemático
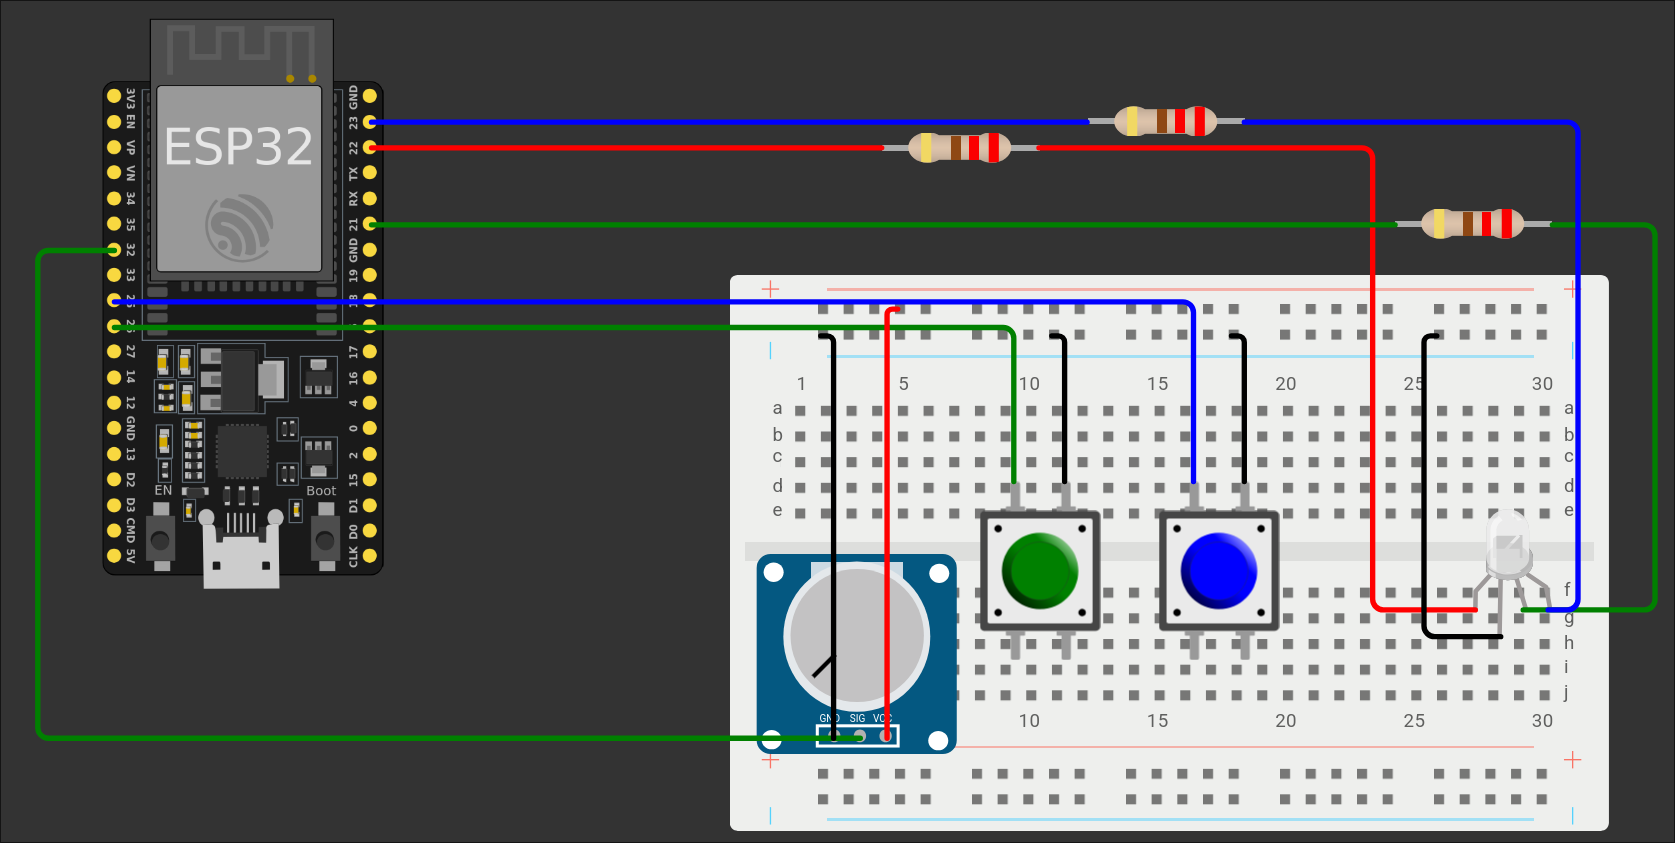

Pin ESP32 |
Componente |
Función |
3V3 |
Riel de alimentación de la Protoboard (positivo) |
Alimentación general para componentes (Potenciómetro, Botones) |
GND |
Riel de tierra de la Protoboard (negativo) |
Tierra general para componentes (Potenciómetro, Botones, LED RGB) |
32 |
Potenciómetro (SIG) |
Entrada analógica para simular el manubrio de carreras |
26 |
Botón 1 |
Entrada digital |
25 |
Botón 2 |
Entrada digital |
22 |
Resistor 220 Ohm (a LED RGB Rojo) |
Salida PWM para controlar el color Rojo del LED RGB |
21 |
Resistor 220 Ohm (a LED RGB Verde) |
Salida PWM para controlar el color Verde del LED RGB |
23 |
Resistor 220 Ohm (a LED RGB Azul) |
Salida PWM para controlar el color Azul del LED RGB |
Daemon
El Daemon es el encargado de comunicar el ESP32 con TIC-80. Este se ejecuta en el mismo computador
al cual el ESP32 se conecta por USB y ejecuta el TIC-80. Este puede ser programado en Go o Python
y debe comunicarse via serial con el ESP32 y leer el stdout generado por TIC-80.
-
Biblioteca de Keyboard para Python: https://github.com/boppreh/keyboard
-
Biblioteca de Comunicación Serial para Python: https://pyserial.readthedocs.io/en/latest/index.html
-
Biblioteca de Keyboard para Go: https://github.com/micmonay/keybd_event
-
Biblioteca de Comunicación Serial para Go: https://github.com/bugst/go-serial
Ejemplo de Daemon en Go
Este ejemplo de Daemon en Go muestra cómo leer la entrada serial del ESP32, simular eventos de teclado para TIC-80, y cómo procesar comandos que representarían eventos del juego para enviar de vuelta al ESP32 (en este caso, para controlar el LED RGB).
package main

import (
	"bufio"
	"io"
	"log"
	"os"
	"strconv"
	"strings"
	"time"

	"github.com/micmonay/keybd_event"
	"go.bug.st/serial"
)

type KeyAction struct {
	Key      int
	Duration time.Duration // 0 = tap, >0 = hold for this duration
}

type State struct {
	prevPotValue  int
	prevPotTime   time.Time
	keyActionChan chan KeyAction
}

var appLogger = log.New(os.Stdout, "[APP] ", log.LstdFlags|log.Lshortfile)

func main() {
	portName := "/dev/ttyUSB0"
	baudRate := 115200

	if len(os.Args) > 1 {
		portName = os.Args[1]
	}

	appLogger.Printf("Attempting to open serial port: %s at %d baud...\n", portName, baudRate)

	mode := &serial.Mode{
		BaudRate: baudRate,
	}

	port, err := serial.Open(portName, mode)
	if err != nil {
		appLogger.Fatalf("Failed to open serial port %s: %v\n", portName, err)
	}
	defer func() {
		appLogger.Println("Closing serial port...")
		if err := port.Close(); err != nil {
			appLogger.Printf("Error closing serial port: %v\n", err)
		}
	}()

	appLogger.Printf("Successfully opened serial port %s. Starting goroutines...\n", portName)

	keyActionChan := make(chan KeyAction, 10)
	serialWriteChan := make(chan []byte, 10)
	serialReadLinesChan := make(chan string, 100)

	state := State{
		prevPotValue:  -1,
		prevPotTime:   time.Now(),
		keyActionChan: keyActionChan,
	}

	go keyboardWorker(keyActionChan)

	go serialReaderGoroutine(port, serialReadLinesChan)

	go serialWriterGoroutine(port, serialWriteChan)

	go stdinProcessorGoroutine(&state, serialWriteChan)

	go func() {
		var button1Pressed bool
		var button2Pressed bool

		for line := range serialReadLinesChan {
			appLogger.Printf("[Serial Data] Received: %s\n", line)
			action, newButton1Pressed, newButton2Pressed := getSerialKeyAction(&state, line, button1Pressed, button2Pressed)
			button1Pressed = newButton1Pressed
			button2Pressed = newButton2Pressed

			if action.Key != 0 {
				select {
				case state.keyActionChan <- action:
				default:
					appLogger.Printf("Warning: keyActionChan full, dropping action: %+v", action)
				}
			}
		}
		appLogger.Println("[Serial Processor] Exiting.")
	}()

	select {}
}

func serialReaderGoroutine(port serial.Port, outputChan chan<- string) {
	appLogger.Println("[Serial Reader] Starting to read from serial port...")
	reader := bufio.NewReader(port)
	for {
		line, err := reader.ReadString('\n')
		if err != nil {
			appLogger.Printf("[Serial Reader] Error reading from serial port: %v\n", err)
			if err == io.EOF || strings.Contains(err.Error(), "device disconnected") || strings.Contains(err.Error(), "no such file") {
				appLogger.Println("[Serial Reader] Device likely disconnected. Pausing for 5s before retrying read.")
				time.Sleep(5 * time.Second)
			} else {
				time.Sleep(100 * time.Millisecond)
			}
			continue
		}

		line = strings.TrimSpace(line)
		if line == "" {
			continue
		}
		outputChan <- line
	}
}

func serialWriterGoroutine(port serial.Port, inputChan <-chan []byte) {
	appLogger.Println("[Serial Writer] Starting to write to serial port...")
	for data := range inputChan {
		n, err := port.Write(data)
		if err != nil {
			appLogger.Printf("[Serial Writer] Error writing %q to serial: %v\n", data, err)
		} else {
			appLogger.Printf("[Serial Writer] Wrote %d bytes to serial: %q\n", n, data)
		}
	}
	appLogger.Println("[Serial Writer] Exiting.")
}

func stdinProcessorGoroutine(state *State, serialWriteChan chan<- []byte) {
	appLogger.Println("[Stdin Processor] Reading from stdin. Type 'serial:<message>' to send to serial.")
	appLogger.Println("[Stdin Processor] Example: serial:AT\\r\\n")
	scanner := bufio.NewScanner(os.Stdin)
	for scanner.Scan() {
		line := scanner.Text()
		appLogger.Printf("[Stdin Processor] Received from stdin: %q\n", line)
		processStdinCommand(state, line, serialWriteChan)
	}
	if err := scanner.Err(); err != nil {
		appLogger.Printf("[Stdin Processor] Error reading stdin: %v\n", err)
	}
	appLogger.Println("[Stdin Processor] Stdin closed or error. Exiting.")
}

func processStdinCommand(state *State, input string, serialWriteChan chan<- []byte) {
	if after, ok := strings.CutPrefix(input, ">event:"); ok {
		switch after {
		case "explode":
			msgBytes := []byte("red")
			select {
			case serialWriteChan <- msgBytes:
				appLogger.Printf("[Stdin Cmd] Queued message for serial: %q\n", msgBytes)
			default:
				appLogger.Println("[Stdin Cmd] Serial write channel full, dropping message.")
			}
		case "score_milestone":
			msgBytes := []byte("blue")
			select {
			case serialWriteChan <- msgBytes:
				appLogger.Printf("[Stdin Cmd] Queued message for serial: %q\n", msgBytes)
			default:
				appLogger.Println("[Stdin Cmd] Serial write channel full, dropping message.")
			}
		}
	} else {
		appLogger.Printf("[Stdin Cmd] Unrecognized stdin command: %q\n", input)
	}
}

func getSerialKeyAction(state *State, input string, button1Pressed bool, button2Pressed bool) (KeyAction, bool, bool) {
	if strings.Contains(input, "Button 1:") {
		if strings.Contains(input, "pressed") && !button1Pressed {
			appLogger.Println("[Serial Data] Button 1 pressed.")
			return KeyAction{Key: keybd_event.VK_X, Duration: 0}, true, button2Pressed
		} else if strings.Contains(input, "released") {
			appLogger.Println("[Serial Data] Button 1 released.")
			return KeyAction{}, false, button2Pressed
		}
		return KeyAction{}, button1Pressed, button2Pressed
	}

	if strings.Contains(input, "Button 2:") {
		if strings.Contains(input, "pressed") && !button2Pressed {
			appLogger.Println("[Serial Data] Button 2 pressed.")
			return KeyAction{Key: keybd_event.VK_Z, Duration: 0}, button1Pressed, true
		} else if strings.Contains(input, "released") {
			appLogger.Println("[Serial Data] Button 2 released.")
			return KeyAction{}, button1Pressed, false
		}
		return KeyAction{}, button1Pressed, button2Pressed
	}

	if strings.HasPrefix(input, "Potentiometer:") {
		parts := strings.Split(input, " ")
		if len(parts) < 2 {
			return KeyAction{}, button1Pressed, button2Pressed
		}

		rawStr := strings.TrimPrefix(parts[1], "raw=")
		rawVal, err := strconv.Atoi(rawStr)
		if err != nil {
			return KeyAction{}, button1Pressed, button2Pressed
		}

		if state.prevPotValue == -1 {
			state.prevPotValue = rawVal
			state.prevPotTime = time.Now()
			return KeyAction{}, button1Pressed, button2Pressed
		}

		diff := rawVal - state.prevPotValue

		now := time.Now()
		if now.Sub(state.prevPotTime) <= 50*time.Millisecond {
			return KeyAction{}, button1Pressed, button2Pressed
		}

		var key int
		absDiff := diff
		if diff > 0 {
			key = keybd_event.VK_RIGHT
		} else if diff < 0 {
			key = keybd_event.VK_LEFT
			absDiff = -diff
		} else {
			return KeyAction{}, button1Pressed, button2Pressed
		}

		if absDiff < 50 {
			return KeyAction{}, button1Pressed, button2Pressed
		}

		duration := calculateDuration(absDiff)
		appLogger.Printf("[Serial Data] Potentiometer changed by %d. Sending key %v for %v.\n", diff, key, duration)

		state.prevPotValue = rawVal
		state.prevPotTime = now

		return KeyAction{Key: key, Duration: duration}, button1Pressed, button2Pressed
	}

	return KeyAction{}, button1Pressed, button2Pressed
}

func keyboardWorker(ch <-chan KeyAction) {
	appLogger.Println("[Keyboard Worker] Starting...")
	kb, err := keybd_event.NewKeyBonding()
	if err != nil {
		appLogger.Fatalf("Fatal: failed to create KeyBonding in worker: %v", err)
		return
	}

	for action := range ch {
		appLogger.Printf("[Keyboard Worker] Performing action: %+v\n", action)
		if action.Duration == 0 {
			kb.SetKeys(action.Key)
			kb.Launching()
		} else {
			kb.SetKeys(action.Key)
			kb.Press()
			time.Sleep(action.Duration)
			kb.Release()
		}
	}
	appLogger.Println("[Keyboard Worker] Exiting.")
}

func calculateDuration(diff int) time.Duration {
	switch {
	case diff >= 1000:
		return 500 * time.Millisecond
	case diff >= 500:
		return 300 * time.Millisecond
	case diff >= 250:
		return 200 * time.Millisecond
	case diff >= 100:
		return 100 * time.Millisecond
	case diff >= 50:
		return 50 * time.Millisecond
	default:
		return 0
	}
}
Programa para ESP32 (Elixir/AtomVM)
Este programa está diseñado para ejecutarse en un ESP32 utilizando AtomVM. Su función principal es leer el estado de los sensores de entrada (botones y potenciómetro) y enviar esta información por el puerto serial al Daemon en el computador. Adicionalmente, escucha el puerto serial para recibir comandos del Daemon (basados en eventos del juego TIC-80) y controlar el LED RGB.
defmodule Tic80 do
  @led_duty 1000
  @rgb_duty 4000

  @high_speed_timer 0

  @led_r 22
  @led_g 21
  @led_b 23

  @button_1_pin 26
  @button_2_pin 25
  @potentiometer_pin 32

  def start do
    rgb_channels = setup_leds()
    setup_input(rgb_channels)

    LEDC.set_duty(LEDC.high_speed_mode(), 0, @led_duty)
    LEDC.update_duty(LEDC.high_speed_mode(), 0)

    spawn(fn -> button_monitor(@button_1_pin, "Button 1") end)
    spawn(fn -> button_monitor(@button_2_pin, "Button 2") end)
    spawn(fn -> potentiometer_monitor(@potentiometer_pin) end)

    Process.sleep(:infinity)
  end

  defp setup_leds() do
    ledc_hs_timer = [
      {:duty_resolution, 13},
      {:freq_hz, 5000},
      {:speed_mode, LEDC.high_speed_mode()},
      {:timer_num, @high_speed_timer}
    ]

    :ok = LEDC.timer_config(ledc_hs_timer)

    ledc_channel = [
      [
        {:channel, 1},
        {:duty, 0},
        {:gpio_num, @led_r},
        {:speed_mode, LEDC.high_speed_mode()},
        {:hpoint, 0},
        {:timer_sel, @high_speed_timer}
      ],
      [
        {:channel, 2},
        {:duty, 0},
        {:gpio_num, @led_g},
        {:speed_mode, LEDC.high_speed_mode()},
        {:hpoint, 0},
        {:timer_sel, @high_speed_timer}
      ],
      [
        {:channel, 3},
        {:duty, 0},
        {:gpio_num, @led_b},
        {:speed_mode, LEDC.high_speed_mode()},
        {:hpoint, 0},
        {:timer_sel, @high_speed_timer}
      ]
    ]

    Enum.each(ledc_channel, fn channel_config -> :ok = LEDC.channel_config(channel_config) end)
    :ok = LEDC.fade_func_install(0)

    %{
      red: Enum.at(ledc_channel, 0),
      green: Enum.at(ledc_channel, 1),
      blue: Enum.at(ledc_channel, 2)
    }
  end

  defp button_monitor(pin, name) do
    GPIO.set_pin_mode(pin, :input)
    GPIO.set_pin_pull(pin, :up)
    button_loop(pin, name, :released)
  end

  defp button_loop(pin, name, last_state) do
    current_state =
      case GPIO.digital_read(pin) do
        :low -> :pressed
        :high -> :released
      end

    if current_state != last_state do
      :io.format('~s: ~s~n', [name, current_state])
      Process.sleep(50)
      button_loop(pin, name, current_state)
    else
      Process.sleep(100)
      button_loop(pin, name, last_state)
    end
  end

  defp potentiometer_monitor(pin) do
    :ok = :esp_adc.start(pin, bitwidth: :bit_max, atten: :db_12)
    pot_loop(pin, nil, nil)
  end

  defp pot_loop(pin, last_raw, last_mv) do
    case :esp_adc.read(pin, [:raw, :voltage, samples: 48]) do
      {:ok, {raw, mv}} ->
        if last_raw == nil || abs(raw - last_raw) > 50 do
          :io.format('Potentiometer: raw=~p mv=~p~n', [raw, mv])
          Process.sleep(200)
          pot_loop(pin, raw, mv)
        else
          Process.sleep(200)
          pot_loop(pin, last_raw, last_mv)
        end

      error ->
        :io.format('ADC error: ~p~n', [error])
        Process.sleep(500)
        pot_loop(pin, last_raw, last_mv)
    end
  end

  defp setup_input(rgb_channels) do
    uart = :uart.open("UART0", rx: 3, tx: 1, speed: 115_200)
    :io.format('UART0 opened successfully. Sending and receiving on ~p~n', [uart])
    spawn(fn -> loop_read(uart, rgb_channels) end)
  end

  defp loop_read(uart, rgb_channels) do
    data = :uart.read(uart)

    case data do
      '' ->
        Process.sleep(50)

      {:ok, string} ->
        :io.format('Received: ~p~n', [string])

        process_command(string, rgb_channels)
    end

    loop_read(uart, rgb_channels)
  end

  defp process_command(<<"red">>, %{red: red_channel}) do
    apply_duty(red_channel, @rgb_duty)
    Process.sleep(1000)
    apply_duty(red_channel, 0)
  end

  defp process_command(<<"green">>, %{green: green_channel}) do
    apply_duty(green_channel, @rgb_duty)
    Process.sleep(1000)
    apply_duty(green_channel, 0)
  end

  defp process_command(<<"blue">>, %{blue: blue_channel}) do
    apply_duty(blue_channel, @rgb_duty)
    Process.sleep(1000)
    apply_duty(blue_channel, 0)
  end

  defp process_command(_, _), do: :io.format('Invalid input.~n')

  defp apply_duty(channel_config, duty) do
    speed_mode = :proplists.get_value(:speed_mode, channel_config)
    channel = :proplists.get_value(:channel, channel_config)
    :ok = LEDC.set_duty(speed_mode, channel, duty)
    :ok = LEDC.update_duty(speed_mode, channel)
  end
end
Ejecución
Luego de modificar el código fuente del juego, crear el proyecto de Go y
flashear el programa al ESP32, el proyecto se puede ejecutar con el comando
tic80 ./car_adventure.tic | sudo go run main.go. Esto conecta el stdout del
juego TIC-80 con el Daemon de Go a través de una pipe.
Flujo de Datos y Control
Para entender cómo todos los componentes interactúan, podemos seguir el flujo de datos y control a través del sistema:
-
Entrada Física (Hardware - ESP32):
-
El Potenciómetro y los Botones son manipulados por el jugador.
-
El ESP32, ejecutando el programa Elixir, monitorea constantemente el estado de estos componentes.
-
Lee el valor analógico del potenciómetro a través de un pin.
-
Detecta los cambios de estado (presionado/liberado) de los botones a través de pines GPIO.
-
-
Comunicación Serial (ESP32 a Computador):
-
El programa del ESP32 imprime los valores y estados leídos (ej.
Potentiometer: raw=XXXX,Button 1: pressed) a su output serial. -
Este output serial se envía al computador host a través de la conexión USB (que utiliza un puerto serial, típicamente
/dev/ttyUSB0en Linux).
-
-
Procesamiento del Daemon (Computador):
-
El Daemon Go se ejecuta en el computador host.
-
La goroutine
serialReaderGoroutinedel Daemon lee continuamente los datos del puerto serial (provenientes del ESP32). -
La función
getSerialKeyActiondel Daemon procesa estas líneas. Por ejemplo, un cambio significativo en el potenciómetro se traduce en una acción de "flecha derecha" o "flecha izquierda", y una pulsación de botón en "tecla X" o "tecla Z". -
Estas acciones de teclado son enviadas a través del
keyActionChana la goroutinekeyboardWorker.
-
-
Control del Juego (Daemon a TIC-80):
-
La goroutine
keyboardWorkerdel Daemon utiliza la bibliotecakeybd_eventpara simular pulsaciones de teclas en el sistema operativo. -
El juego TIC-80 (CAR ADVENTURE) está ejecutándose en el mismo computador y recibe estas pulsaciones de teclas como si un jugador estuviera interactuando directamente con el teclado. Esto permite controlar el auto, acelerar, etc.
-
-
Eventos del Juego (TIC-80 a Daemon):
-
Mientras el juego TIC-80 se ejecuta, las modificaciones hechas en su código (
trace("event:score_milestone"),trace("event:explode")) envían eventos específicos a su salida estándar (stdout). -
La goroutine
stdinProcessorGoroutinedel Daemon (leyendo elstdoutdel proceso TIC-80) detecta estos eventos.
-
-
Retroalimentación al Jugador (Daemon a ESP32 a Hardware):
-
Cuando el Daemon detecta un evento (como "explode"), la función
processStdinCommandenvía un comando específico (ej. "red" para explosión, "blue" para hito de score) alserialWriteChan. -
La goroutine
serialWriterGoroutinedel Daemon envía estos comandos de vuelta al ESP32 a través del puerto serial. -
El programa del ESP32, en su
loop_readyprocess_command, recibe e interpreta estos comandos. -
Finalmente, la función
apply_dutydel ESP32 controla el led RGB conectado a sus pines, encendiendo el color correspondiente (rojo para explosión, azul para score milestone) para dar retroalimentación visual al jugador.
-